Archive for February, 2011

Meshugeneh for Pierogies

Meshugeneh is all I can think of to describe my Pierogi experience.  Meshugeneh is Yiddish for “crazy, insane, mad”.  I LOVE this word… and use it often.  It rolls of the tongue and feels crazy… and I felt crazy after  my Sunday with pierogies!

First thing that is meshugeneh about this project is that there are so many variations of the dough recipe.  All basically the same in their core, but different amounts of this and that.  I chose a recipe that was traditional to Philladelphia.  And the variety of fillings is endless; there are savory and there are sweet.  All equally as good!

I figured since I was feeling meshugeneh I had better tone it down and go with a traditional filling, cabbage and bacon.  Then I was thinking… a pierogi is just another kind of ravioli.  Why  not make a sausage and pepper filling.  Ah-ha meshugeneh at work!

Ingredients:

  • 2 cups flour, plus extra for kneading and rolling dough
  • 1/2 teaspoon salt
  • 1 large egg
  • 1/2 cup sour cream
  • 1/4 cup butter, softened and cut into small pieces
  • ingredients for filling of your choice (my fillings below)

Preparation:

Pierogi Dough
To prepare the pierogi dough, mix together the flour and salt. Beat the egg, then add all at once to the flour mixture. Add the 1/2 cup sour cream and the softened butter pieces and work until the dough loses most of its stickiness (about 5-7 minutes). You can use a food processor with a dough hook for this, but be careful not to overbeat. Wrap the dough in plastic and refrigerate for 20-30 minutes or overnight; the dough can be kept in the refrigerator for up to 2 days. Each batch of dough makes about 12-15 pierogies, depending on size.
Filling Traditional Cabbage & Bacon and Not Traditional Sausage & Peppers
  • Finely chopped bacon 3 strips
  • 1/4 cabbage head finely chopped

Saute bacon till crisp, add cabbage and saute till cooked through.  Set to the side and let cool.

In a separate pan…

  • 1/4 lb ground italian sausage
  • 1/2 red bell pepper finely chopped
  • 1/2 yellow onion finely chopped

Saute peppers & onions till soft, remove from pan and saute sausage till done.  Mix together and set to the side till cool.

Prepare the Pierogies
Roll the pierogi dough on a floured board or countertop until 1/8″ thick. Cut circles of dough (2″ for small pierogies and 3-3 1/2″ for large pierogies) with a cookie cutter or drinking glass. Place a small ball of filling (about a tablespoon) on each dough round and fold the dough over, forming a semi-circle. Press the edges together with the tines of a fork.

Boil the perogies a few at a time in a large pot of water. They are done when they float to the top (about 5 minutes). Rinse in cool water and let dry.

Once they are dry you can saute them in butter and serve.  You can also freeze them for another day (maybe when you recover and have full use of your senses).  Place them on a baking sheet to freeze, once frozen remove from the sheet and place in a Ziploc bag and back in the freezer.

We had to start with not traditional.  I had stunk up the house so bad with cabbage that I was pretty certain I needed a little time between serving my traditional variety!

I had prepared extra of the sausage and peppers so I added it to my marinara sauce and labeled a nice pile of sauce on my plate, topped with a few pierogi’s and finished it with a good a slice of garlic cheese bread.  Mangia Pierogi!  My lovely little Polish ravioli!

Love,

Candis aka West

Pierogie Project – Cooking Together

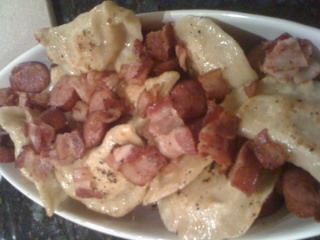
When Radhika suggested we make pierogies I was hesitant.  My only experience with pierogies was seeing a bag of them in my supermarket freezer.  I was always a little afraid of them.  Then I did some research online and really became intimidated by making them from scratch!  I dove in with both feet though.  That’s what I absolutely love about this blog we three friends share.  These girls are always challenging me to make new things and I am reveling in it!  So is my family!  They are loving all of the new foods I am making lately and they like to hear the stories I share with them over what I have learned in my research.  Like for example, I had no idea where the pierogie came from.   If you’re curious about it too, check out Wiki.  Here’s my recipe:

Potato and Cheese Pierogies with Kielbasa and Bacon – adapted from My Gourmet Connection

For the dough ~

  • 3-1/2 cups all-purpose flour, plus more for dusting
  • 3 large eggs
  • 2 tablespoons sour cream
  • 3/4 to 1 cup water

For the filling ~

  • 1-1/2 lbs baking potatoes, peeled and cut into 1-inch slices
  • 2 tablespoons unsalted butter
  • 1 tablespoon extra-virgin olive oil
  • 1 small sweet onion, chopped
  • 1 clove garlic, minced
  • 1/4 teaspoon dried thyme
  • 3/4 to 1 cup grated dry farmer’s cheese
  • Kosher salt and freshly ground pepper to taste

For the dough ~

  1. In a large bowl or mixer, combine the flour, eggs, sour cream and 1/2 cup of water. Beat the eggs as you mix and gradually add the rest of the water until the mixture is combined.
  2. Turn the dough onto a well floured surface. Knead it gently, using a dropping technique (lift the dough from the surface and drop it down). Knead only until the ingredients are blended and the dough is smooth and slightly sticky, about 3 to 5 minutes. Be careful not to over work the dough.
  3. Wrap the dough ball in plastic wrap and let it rest for at least 20 to 30 minutes while you prepare the filling.

For the filling ~

  1. Put the potatoes in a medium pot and add just enough cold, salted water to cover them. Bring to a boil and cook until the potatoes are soft, about 20 minutes.
  2. While the potatoes cook, melt the butter and oil over medium heat in a large saute pan. Add the onion, garlic and thyme, cooking until the onion turns translucent, about 2 minutes. Lower the heat and continue cooking until onions caramelize slightly, about 20 minutes. You may need to add a bit more butter as the onion and garlic mixture cooks. Season with salt and pepper to taste and set aside to cool.
  3. When the potatoes are soft, drain them in a colander and lightly press out the remaining moisture. Return them to the pot, remove from heat and add the cooled onion mixture and the cheese. Mash them just until blended and large lumps are gone. Season again with salt and pepper to taste. Set aside to cool while you roll out the pierogi dough.

Assemble and cook ~

  1. Bring a large pot of salted water to a boil over high heat. With lightly floured hands, pinch off tablespoon sized portions of the dough and roll them into balls. The balls should be about 1-1/2 inches in diameter, yielding about 3 dozen total.
  2. On a well floured surface, gently roll each ball with a rolling-pin until about 1/8 inch thick and 3-1/2 inches round. Cover the finished rounds with a damp towel so they don’t dry out while you’re working.
  3. Once your rounds are rolled out, hold each in the palm of your hand, filling the center of it with a generous tablespoon of the potato mixture. Gently fold the round in half, pulling the edges away and pinching them firmly shut to enclose the filling. Be sure the edges are sealed by working from one end to the other.
  4. As you work, set your filled pierogi aside on a floured surface and cover them with plastic wrap.
  5. Working in batches, drop no more than 6 pierogi at a time into the boiling water. After they float back to the surface, allow them to cook another 2 to 4 minutes. Remove the pierogi with a slotted spoon and place on a towel to drain and cool.

Here’s the part where you put it together with the Kielbasa and Bacon

Kielbasa and Pierogies with Bacon – adapted from Cooking Tip of the Day

  • 1 Hillshire Farm Kielbasa, sliced (¼ inch slices)
  • 12 regular size Pierogies
  • 2 large onions, halved then sliced
  • 3 strips thick sliced smoked bacon
  • 2-3 tablespoons butter
  • Sour Cream
  1. Preheat the oven to 225 degrees F.
  2. In a large skillet, over medium heat, cook the bacon strips until cooked but still pliable.
  3. Remove the bacon and drain on paper towels… then chop. Set aside.
  4. Add 1-2 tablespoons of butter to the skillet with the rendered bacon fat. You should have a total of about 3 tablespoons of fat between the butter and the bacon grease. Melt the butter.
  5. Add the onions and Kielbasa slices… cook the onions until soft and translucent. Remove the onions an oven safe 9×13 baking dish. Keep them warm in the preheated oven.
  6. Continue to cook the Kielbasa slices until browned on both sides.
  7. Remove from the pan and drain on paper towels. Add them to the baking dish and return dish to the oven to keep warm until pierogies are done cooking.
  8. Add 1-2 tablespoons butter to the skillet.
    Note: You should have about 3 tablespoons of fat totally in your skillet…. the Kielbasa will render some fat… so depending on the fat from the bacon and the Kielbasa… will determine how much butter you need to add.
  9. Add the pierogies to the hot skillet. Cook over medium heat until lightly browned on both sides
  10. Remove from the skillet when they are lightly browned and drain on paper towels.
  11. Add the pierogies to the baking dish with the onions and Kielbasa…. Toss lightly to mix.
  12. Sprinkle chopped bacon over the top and serve with sour cream on the side.

That’s a lot, right!  You should never pierogie alone!  Trust me, I am now convinced that you should have a friend over and a bottle of wine and pierogie together!  They were gone within minutes though, they are truly and delightfully yummy!

Thanks for stopping by!

Dee Continue reading

Cooking together – Pierogis!

Once in a while Dee, Candi and I like to cook “together”. We each lead busy lives and Candi lives a few hours away, so we cook together by cooking the same dish in each of our unique styles at our own convenience and then blog about it.
I think when we cook the same dish, it is fun to see what each of us comes up with. I think that what we make of the dish and how we make it reflects each of our personalities. So fun to dissect to our personalities, if you are into that sort of thing, of course!
Pierogis are delicious. But they are labor intensive. I am nonetheless including them in my cookbook as my boys really love them. Someday, they can make it using mom’s recipe and complain about how labor intensive it is and yet are gone in a flash! There will no leftovers with this dish. I can promise you that.

Here’s my recipe for the pierogis:
Polish Pierogis the Indian American way!

Enjoy~!
Radhika aka East.

A book in progress…finally!

Remember the book I had mentioned about wanting to write? Well, it is finally on it’s way. It is thanks to this blog that I share with Dee and Candis that I have finally embarked on the exciting journey of seeing my book to fruition. When I see Dee and Candis post, it inspires me to post. While I am still new to writing blog posts and detailing the recipes, I am enjoying it.
I am trying to post about every recipe the boys enjoy. I am not sure which recipes will make it took the book, but it sure is a learning process for me.
I hope my boys enjoy reading it as much as I am enjoying working on it.

Here it is: the blog which details my cookbook’s journey:
http://cookingbytes.wordpress.com/

I hope you will join me on this journey as well!

Much love,
Radhika.

Twiced Baked Goodness

I know somewhere along the line I mentioned my love of bread and POTATOES!  OH, potato… potato… why do I want to put an “e” on the end of your name???

I had a bunch of leftover mashed potatoes in the fridge and needed to do something with them today… HATE to have things go to waste!  My Connie and I were talking the other day about twice baked potatoes, she freezes hers in little scoops to take out later and bake for dinner.  So I went with that and added a few extra goodies!

Twice Baked Leftovers

  • Mashed  Potatoes
  • Shredded Cheese
  • Bacon Pieces

Mix everything together and form patties; I do a hockey puck size.  Place on a wax paper lined cookie sheet and put in freezer till hard.  Transfer to a Ziploc bag and keep in freezer.

When you are ready to use, put in a baking dish in a 350 oven and bake for 30 minutes.

You could do add whatever you like to these potato lovelies… onion and bacon, broccoli and cheddar, you name it!  Give it a try with your next batch of leftover mashed potatoes!

Love,

Candis aka West

Gyros for a Party

A dear friend of mine is turning 50 this week.  Her husband decided to throw a party in her honor; such a sweet thing to do.  The invite said “no gifts”.  Hum, not my favorite party theme!  I have to bring something!  Wine?  That is too obvious and Lynn already said they bought cases of the good stuff for the occasion.  So what’s a girl to bring?  Gyros Meatballs!

I have made these little lovelies a few times for appetizers for parties.  They are good hot, cold and everything in-between (ha, pun intended!).  I slightly changed the recipe from Alton Brown from FoodTV.  I LOVE him and his quirky ways!  Nerd meets chef… nice!

Gyros Meatballs with Tzatziki Sauce

Ingredients

  • 1 medium onion, finely chopped or shredded
  • 2 pounds ground lamb
  • 1 tablespoon finely minced garlic
  • 1 tablespoon dried marjoram
  • 1 tablespoon dried ground rosemary
  • 2 teaspoons kosher salt
  • 1 tablespoon olive oil (Greek preferably)
  • 1/2 teaspoon freshly ground black pepper
  • Tzatziki Sauce, recipe follows

Directions

Process the onion in a food processor for 10 to 15 seconds and turn out into the center of a tea towel. Gather up the ends of the towel and squeeze until almost all of the juice is removed. Discard juice.

Return the onion to the food processor and add the lamb, garlic, marjoram, rosemary, salt, pepper and olive oil and process until it is a fine paste, approximately 1 minute. Stop the processor as needed to scrape down sides of bowl.

Roll out meatballs that are roughly quarter size, a nice mouthful size.  Place on baking tray that has been sprayed with olive oil.  Once all are rolled, spray the tops of the balls with olive oil and place in a preheated 350 degree oven.  Bake for 6 minutes then turn them over and bake for an additional 8 minutes.  Let cool in the oven then place on a paper towel to remove the remaining grease.

Tzatziki Sauce

  • 16 ounces plain Greek yogurt (2% fat is preferred)
  • 1 medium cucumber, peeled, seeded, and finely chopped (if using an English, leave skin and seeds)
  • Pinch kosher salt
  • 4 cloves garlic, finely minced
  • 1 tablespoon olive oil
  • 2 teaspoons red wine vinegar

It is important that you use Greek yogurt, it is thick and creamy.  If you don’t have Greek, use plain and drain it for a few hours in the fridge so the extra water can come out.  Water is bad for this recipe!  Place the chopped cucumber in a tea towel and squeeze to remove the liquid; discard liquid. In a medium mixing bowl, combine the yogurt, cucumber, salt, garlic, olive oil, vinegar, and mint. Store in the refrigerator in an airtight container for up to a week.

Aren’t they pretty?  Can you smell the garlic?  The rule when you make these is that everyone must eat a few so everyone can smell like garlic!  There is safety in numbers with this one, trust me!

Love,

Candis aka West

Snowy Friday

Yep, you read that right.  We woke up to  snow on the ground this morning!  Snow and what I had on the menu didn’t pair well.  Nevertheless, I made it.  I’m a trooper like that.  It was very good but it would have been better if we were sitting on the back porch in the early evening warmth with a Skinny Dip.  Rather, we enjoyed it inside in the warmth of our furnace and a good bottle of Gran Calero – Monastrell 2008.  Sometimes you just have to make do with what you have.

Bread and shrimp skewers with romaine salad

serves 4

  • 3/4 pound large peeled and deveined frozen shrimp (about 24), thawed
  • 2 garlic cloves, minced
  • 1 tablespoon grated lemon zest, plus 2 tablespoons lemon juice
  • 4 tablespoons extra-virgin olive oil
  • coarse salt and ground pepper
  • 5 ounces crusty bread, cut into 1-inch pieces (3 cups)
  • 1 hard-cooked egg yolk, mashed – I left this out as I didn’t have time.  You see I watched Bounty Hunter and My Girlfriends Boyfriend.  Both of which were bad movies but sometimes, that’s what makes your day.
  • 1 teaspoon Dijon mustard
  • 1/4 cup grated Parmesan, plus more for serving
  • 2 large hearts romaine lettuce leaves, separated
  1. Preheat oven to 450.  In a medium bowl, combine shrimp, half the garlic, lemon zest, and 1 tablespoon oil and season with salt and pepper.  Thread shrimp and bread onto eight 8-inch wooden or metal skewers.  Transfer skewers to a rimmed baking sheet and bake until shrimp is opaque throughout and croutons are golden, 7 minutes.
  2. Meanwhile, in a large bowl, combine remaining garlic, lemon juice, 2 tablespoons oil, egg yolk, and mustard; season with salt and pepper.  Whisk until well combined; stir in Parmesan.  Add romaine and toss to coat.  Sprinkle salad with more Parmesan and serve alongside skewers.

Wherever you are in the world, I hope you will enjoy this recipe as much as we did!

Thanks for stopping by!

Dee

Thursday

Old Man Winter reared his ugly head today.  I told you he would likely make an appearance again.  We are currently sitting in the midst of a wintry mix.  It’s cold and blustery and no one in their right mind should have to leave the warmth and coziness of their  homes.  The roads are looking treacherous. No worries though, my Zippidy Do Da sunshine will be back out on Sunday with a forecast of 60 degrees on the radar!  On the menu tonight is couscous and roasted carrots with spiced meatballs.  Doesn’t that sound delightful and warm?  I prepared the meatballs earlier today and my kitchen smells fantastic!  I can’t wait to cook them up.  My belly is rumbling!   I’m not making any changes to this recipe as everything on the menu sounds delightful.  Here’s the recipe:

Couscous and roasted carrots with spiced meatballs

serves 4

  • 1 pound carrots, cut into 2-inch pieces
  • 2 tablespoons extra-virgin olive oil
  • coarse salt and ground pepper
  • 3/4 pound ground beef chuck (85% lean)
  • 1 1/2 teaspoons reserved spice mix (see Menu’s post)
  • 1/2 teaspoon ground cinnamon
  • 2 tablespoons finely chopped fresh cilantro leaves
  • 1 bunch scallions, white and green parts separated, half of each minced and remaining thinly sliced
  • 1 large egg, lightly beaten
  • 1 cup couscous
  • 1/2 cup sliced almonds, toasted
  • lemon wedges, for serving
  1. Preheat oven to 450 degrees.  On a rimmed baking sheets, toss carrots with 2 teaspoons oil and season with salt and pepper.  Roast until tender and golden, 20 minutes, tossing halfway through.
  2. In a medium bowl, combine beef, spice mix, cinnamon, cilantro, minced white and green scallions, and egg; season with salt.  With hands, gently mix to combine and form into 16 meatballs.  In a large skillet, heat 1 tablespoon oil over medium-high.  Cook meatballs until browned on all sides, about 8 minutes total.  Add 1/4 cup water, cover, and reduce heat to low.  Cook until meatballs are just cooked through, 5 minutes.
  3. Meanwhile, in a medium saucepan, heat 1 teaspoon oil over medium-high.  Add sliced scallion whites and cook, stirring, until softened, 3 minutes.  Add 1 cup water, cover, and bring to a boil.  Stir in couscous and season with salt and pepper.  Cover, remove pan from heat, and let stand 5 minutes.  Fluff couscous  with a fork and stir in almonds and sliced scallion   greens.  Serve meatballs and any pan juices with couscous, carrots, and lemon wedges.

Notes:  After consuming this dish, we were not fond of the meatballs.  They need some work.  Any suggestions are welcome!  Everything else was fantastic!

On a side note, I have cinnamon raisin bagel dough in the fridge!  Hot damn, I can’t wait until Saturday to make those suckers up!  Hell, I may not even wait.  I may do it on Friday!  Look at me being the rebel!  Of course I used the recipe that I posted in my Bagels post.  The only thing I did differently was I added a cup of cinnamon chips and a cup of raisins to the dough before I mixed it up.  I don’t think I have to tell you not to add sesame seeds.  The dough smells fantastic!

Oh what a treat!  I ran down stairs to grab my last bag of carrots out of the freezer and I found a little Cadbury creme egg hiding in the grocery bag!  I forgot I bought that.  Natalie will be excited to see it as I bought it for her.  Apparently, she forgot about it too.

Thanks for stopping in on this cold, blustery evening!

Dee

Kid Friendly Comfort Food

The last few days has been a whirl-wind of client meetings and today was filled with follow-up notes and no excitement!  The high of providing my clients home-baked muffins had worn off and it was bone grabbing cold… the kind of cold that sinks in and you can’t shake it.  The temp was 32 today but the humidity was high and the sky was gray; I was in a funk.

At lunch I started dreaming of something to break my funk.  Something that would warm the cockles of my heart and bones!  Ah-ha, that is it!  Head across the pond to Great Brittain for Shepard’s Pie!

I have never made it from scratch, always used a mix and added the usual beef, peas and potatoes.  I could do it, why not!  I found a great recipe by Googling and decided to change it up a bit add my signature!

Shepards Pie

Step 1- make a pot of mashed potatoes, I use russet potatoes and always make extra so I can just pop them in the fridge and take out for later or make potato soup!

Step 2- the meat!  Brown the beef or lamb and add everything listed below in Step 2 in the order it appears.
1.5 lbs ground beef or lamb
1 TBLS dried minced onion
1/4 cup worcestershire sauce
1 TBLS ketchup
1 cup water
1 package of brown gravy (I use Simply Organic, they are great)
1 TBLS butter
salt and pepper to taste

Step 3- veggies!  I used 1 bag of frozen mixed (peas, carrots, corn, beans), half a bag of peas (we love peas) and 1/2 a bag of spinach.  Thaw them prior to adding to the meat.

Step 4- the assembly… in a 9×13-ish baking dish layer in  your meat/veggie mix, top that with a generous layer of mashed potatoes.  Sprinkle with sweet Hungarian paprika and top with a sprinkling of shredded cheese (your choice).  Bake at 350 for a good 20 minutes till everything is bubbly.

Emma, Maddy’s best friend, was over for dinner tonight.  She sometimes doesn’t like to eat at my house as I make the kids try everything once and sometimes even twice!  Funny, when I eat at her mom’s house she does the same thing!  I made each girl a small serving just in case.  Emma took a good long look and declared that she will try it as it smelled good enough.

“Mrs Candis, is that spinach in there?” Emma asked.  “Why yes it is, try it, it tastes like the meat.”  Emma is a meat eater from way back I knew that would hook her!  Emma cautiously took her first bite, then a smile came over her face.  “Yes it does taste good, my mom is always trying to get me to eat that stuff.”  Emma was the first to finish her dinner.  Maddy finished second… but that was only because Maddy had a lot to talk about during dinner!

Try this yummy treat with your picky eaters.  I bet you see smiles like these and clean plates too!

Love,

Candis aka West

The little people!

I had a not-so-great start this morning. I mean, who likes to drive  to work at the speed of 1 inch/10 minute interval? Seriously!?
I thought I handled the 2hrs for a 25 min drive pretty well. I listened to music, I listened to a funny talk show and finally made it in to work. But I had brought someone else along with me. A giant headache had entered the building with me.
I thought we had good security where I worked. Guess I was wrong! I mean, how did the unwelcome guest of a headache manage to get in?
I took a couple Motrins and plowed through the day to not much luck. Around 3:00 PM the headache was worse than ever.
So I left work early and headed home to take a nap. I picked the boys up from school and my niece from daycare (I had to babysit her this evening) and entered the house. I was getting ready for my nap when this happened.

My niece had one of my sons help her put my apron on and she asked me “So what are we making for dinner tonight?”. That was it!! Just the motivation I needed. I thought she and I would make dinner together and I would write a blog post about it.
So I started chopping the onions, when she ran out of the kitchen and the next thing I know, this has happened!

Since I had already started cooking, I decided to finish it. As I was getting close to done, the three little people above were busy arguing. Turns out a few littler people had gone missing. Oh no!! So we searched high and low for the littler people. The little people were happy and calm again when all the littler people were together.

At the end of all this, I was left asking, “Headache?? What headache??”
BTW, in case you were curious, dinner tonight was baked tilapia topped with onion, mushrooms and cherry tomatoes. The onions and mushrooms were cooked in a honey-wine-vinegar sauce. Served with cauliflower-green bean risotto and three bean salad.

How was your evening? I would love to hear about it! Do tell.

Till next time,
Radhika.